

Green screens have long been a staple in film and television production, providing a valuable tool for creators to manipulate the environment in which scenes take place. This technology, formally known as chroma keying (modern green screen), enables filmmakers to seamlessly overlay their subjects onto virtual backgrounds, transporting them from a tiny studio to virtually anywhere in the universe.

Setting Up Your Green Screen video
Choosing the Right Green Screen video
Green screen vary in size and material, catering to a diverse range of needs. The primary attribute is the color, a specific hue of bright green not typically found in clothing or skin tones. This distinct color allows for easier isolation in the post-production process.
Positioning and Prepping the Green Screen video
To ensure effective chroma keying, the green screen should be positioned flat and smooth, devoid of any wrinkles or shadows. Fabric green screens may require ironing or a tension system to eliminate wrinkles.
Lighting the Green Screen video clip video
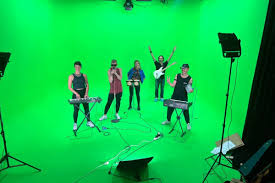
Lighting is crucial in green screen work. Aim for uniform, diffused lighting to avoid creating shadows or hot spots on the green screen backgrounds. Using soft box lights or other diffused lighting solutions can effectively achieve this.
Positioning and Lighting the Subject

Subject Placement for green screen footage
Your subject should stand several feet in front of the green screen, avoiding shadows and preventing green light spill (unwanted green reflection from the green screen works back onto your subject).
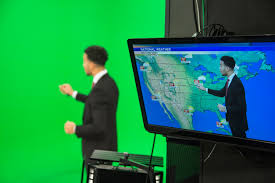
Subject Lighting for green screen
Light your subject separately from your green screen. The goal is to match the lighting on the subject with that of the green screen settings anticipated background in post-production.
Filming or Photographing Your Subject with green screen background
Camera Settings for green screen work
Ensure the use of a camera with a high enough resolution and avoid automatic settings. Manually control the exposure, white balance, and focus to maintain shot consistency.
Post-Production for green screen videos
Choose an Editing Software
There is a myriad of video and photo editing software available today that supports chroma keying. From industry-standard tools like Adobe Premiere Pro and Final Cut Pro, to free alternatives like DaVinci Resolve and HitFilm Express.
Chroma Keying Process
The chroma key feature in your software allows you to remove the green, rendering it transparent and letting your chosen background show through.
Edge Refinement
Fine-tune settings like edge softness, spill suppression, and opacity to blend the subject naturally with the new background. This process may require a bit of practice to master but is integral to achieving a professional look.
FAQ

How do I put a background on my green screen?
Adding a background to your green screen footage is done in the post-production stage using the best video editing software, that has chroma keying capabilities. Here are the general steps on how to use a green screen background:
1. Import Footage:
First, open your preferred video editing software and import both your green screen footage and the background footage green screen scene or image you wish to use.
2. Layer your footage:
3. Apply Chroma Keying:
Now, you need to apply the chroma key effect to your green screen video footage:
- If you're using Adobe Premiere Pro, go to "Effects," then under "Video Effects," go to "Keying" and select "Ultra Key." Drag this effect onto your green screen clip. In the "Effect Controls" panel, use the eyedropper tool next to "Key Color" to select the green color in your footage.
- If you're using Final Cut Pro X, select your green screen footage, then go to the "Effects" browser, select the "Keying" category, and double-click "Keyer." It should automatically detect and remove the green color.
- If you're using a free option like DaVinci Resolve, go to the "Color" workspace, select "Qualifiers," pick the color picker tool, and click on the green background. Then, you might need to adjust settings to get the key just right.
- 4. Fine-Tune Your Key:
After applying the chroma key effect, you'll likely need to adjust some settings to make it look natural. You might need to play around with parameters such visual effects such as edge softness, spill suppression, or color correction to make your subject blend in with the new background.
What program do you use for green screen?

- Adobe Premiere Pro: This is a professional-grade video editing software widely used in the film and television industry. Its "Ultra Key" effect is quite powerful and allows for detailed adjustments.
- Final Cut Pro X: This is Apple's professional video editing software. It has a built-in keyer that is very intuitive and effective. It’s only available for macOS.
- Adobe After Effects: While technically a compositing and special effects software, After Effects is often used in combination with Premiere Pro for more complex keying scenarios. Its "Keylight" plugin is particularly renowned.
- DaVinci Resolve: DaVinci Resolve is a professional-grade video editing software that also offers a powerful color grading panel. It's a good option for green screening due to its high-quality keying tools. Plus, there's a very capable free version available.
- HitFilm Express: This is a free, user-friendly software option with strong keying capabilities, making it a good choice for beginners or those on a budget.
How do you put a green screen on a picture?
The process of applying a green screen effect to a picture, often referred to as chroma keying, is similar to the process with video. You'll need an image editing software that has chroma keying or color range selection capabilities.
1. Import Images:
Open Photoshop and import both the green screen image and the new background image.
2. Selection:
- Select the green screen image layer.
- Use the "Magic Wand" tool, the "Quick Selection" tool, or the "Color Range" option under the "Select" menu to select the green area of your image. The Color Range tool is quite useful as it allows you to select a specific color range.
3. Removal of Green Screen:
Once your green screen areas are selected, press "Delete" on your keyboard to remove them. You should now see a checkerboard pattern which represents a transparent blue background again.
4. Adding New Background:
Now, drag your new background image layer below your subject layer in the layers panel. You should see your subject appearing on the new background.
5. Fine-tuning the green screen effects:
You may need to adjust the edges of your foreground image to make it blend better with the new background. You can do this by using a combination of the "Erase" tool, "Blur" tool, and/or adjustments to the layer's "Opacity".
Blue Screen or Green Screen? Shall I use green or blue screen?

Both green screen and blue screens are used in the film and television industry for chroma keying, and each has its advantages and disadvantages. The choice between a full green screen software or blue screen largely depends on the subject matter being filmed and the specific requirements of the production.
Green Screen Background:

- Advantages: Digital cameras are more sensitive to green, meaning the color can be picked up more clearly and can result in less noise (graininess or speckled spots), making the keying process a bit smoother. Also, green screens require less lighting than blue screens.
- Disadvantages: You can't use a green screen if your subject has green elements (like clothing or eyes), as these parts will be keyed out as well. Green screens can also create more "spill" (green light reflecting onto the subject), which might need to be corrected in post-production.
Blue Screen:
- Advantages: Blue screens are less likely to cause color spill, and they work well when the subject has green elements. Additionally, blue screens have traditionally been used in film because they work well with film stock and are complementary to human skin tone.
- Disadvantages: Blue screens require more lighting than green screens. Also, because digital cameras are less sensitive to blue, footage shot with a blue screen can sometimes have more noise.
for the info on how to record screen on Android please read our blog post Recording Screen Android and Loom Videos on how to record screen on other devices.

